1. Táirge Tharview
The Fuers H.265+ 8-Channel Security DVR Recorder (Model A1008CH) is a versatile surveillance solution designed for home and business security. This DVR supports various camera types including HD-CVBS, TVI, CVI, XVI, AHD, and IP analog cameras, allowing for flexible system expansion. It features H.265+ video compression for efficient storage and comes with a pre-installed 1TB hard drive for 24/7 recording.
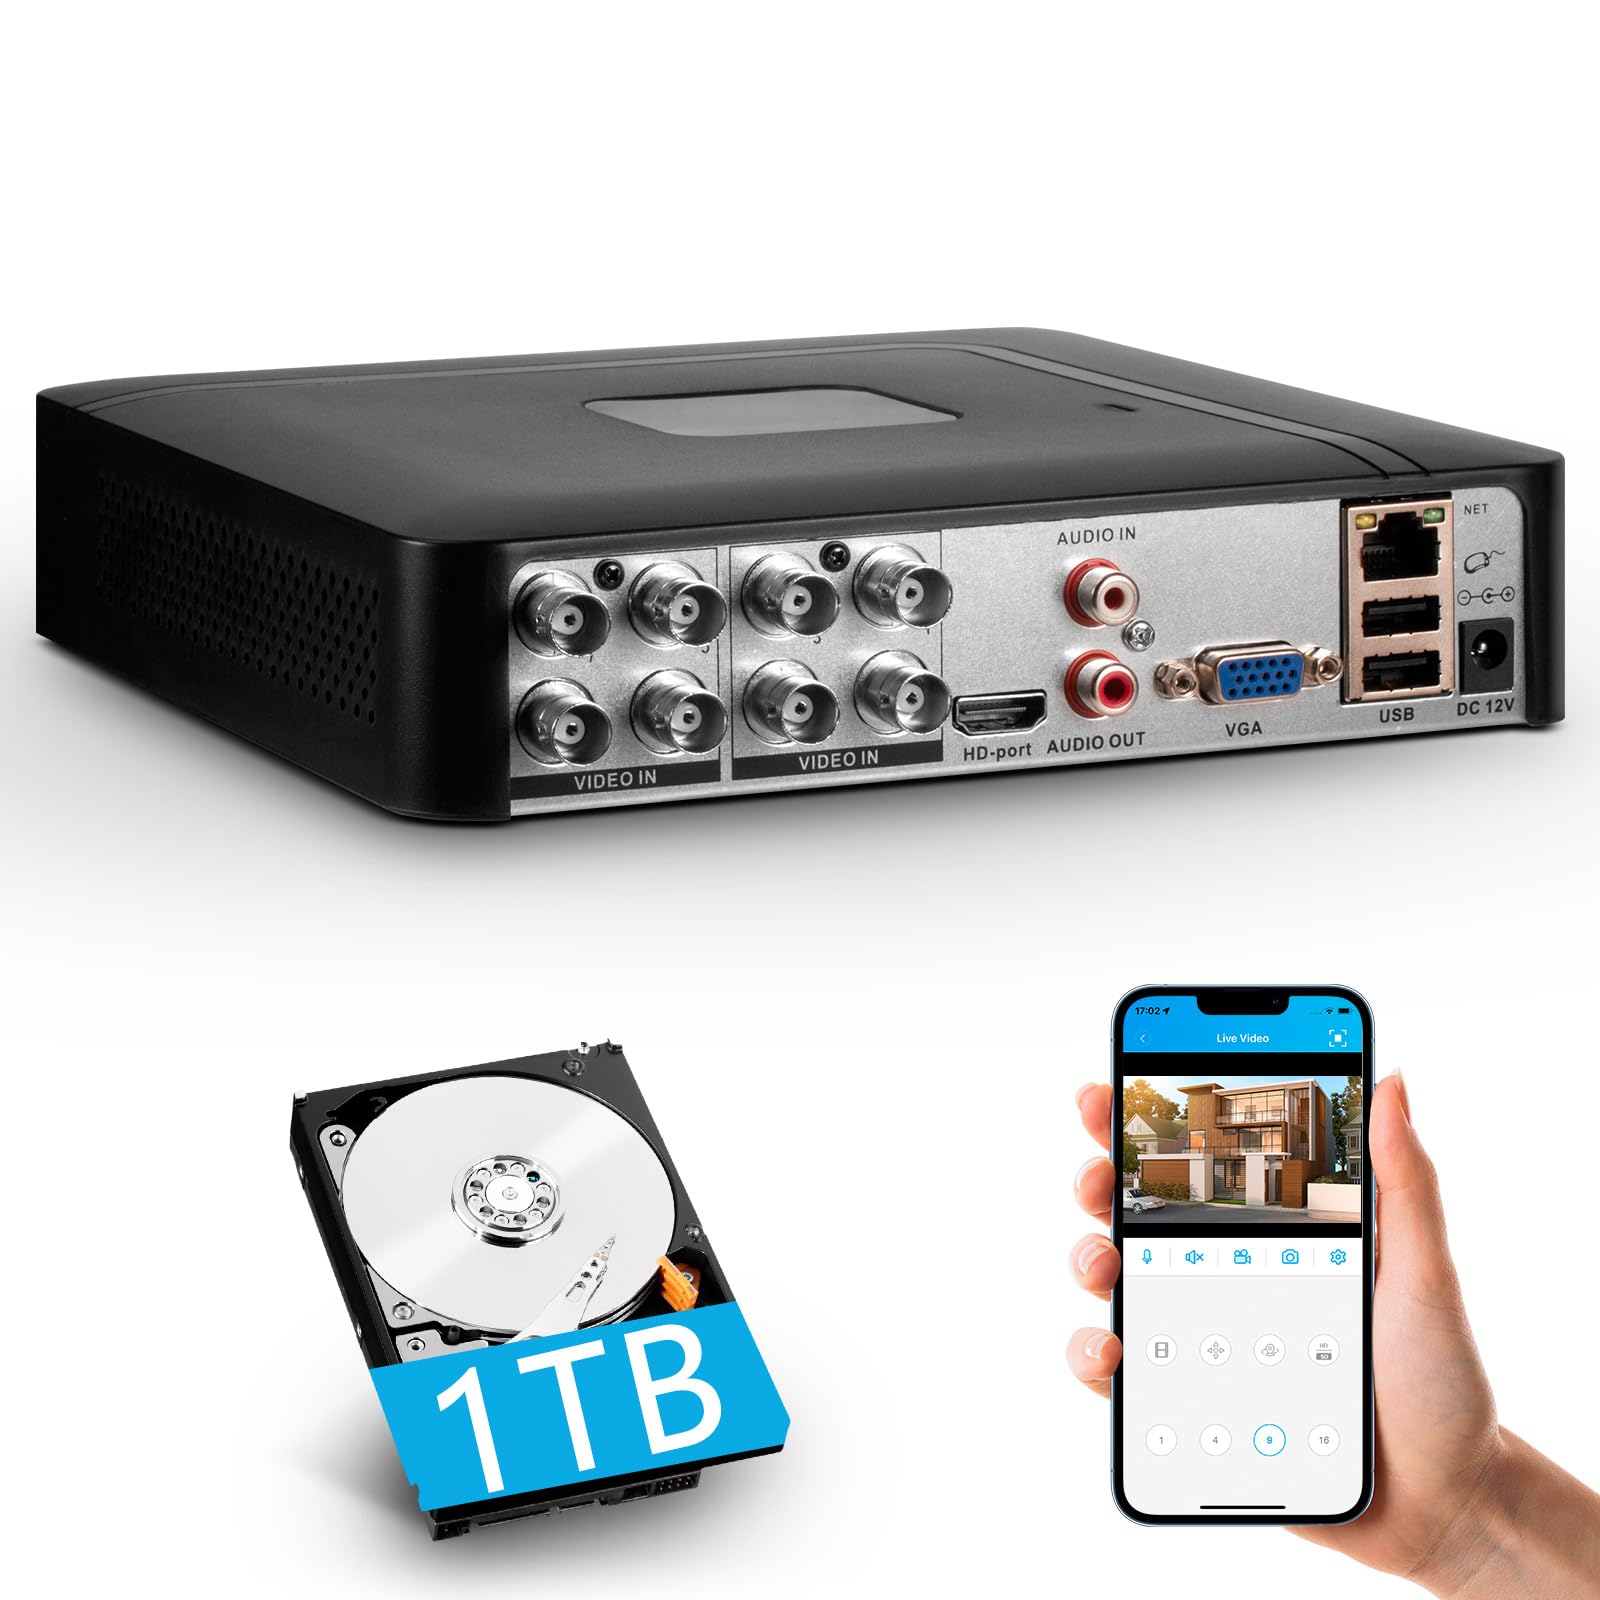
Image 1.1: Fuers H.265+ 8-Channel Security DVR Recorder.
Príomhghnéithe:
- Córas 8-Chainéal: Supports up to 8 cameras simultaneously, compatible with HD-TVI, CVBS, CVI, XVI, AHD, and IP cameras.
- Comhbhrú Físe H.265+: Offers extended recording time and saves up to 50% storage space compared to H.265 systems.
- Pre-installed 1TB HDD: Security-grade hard drive for continuous surveillance recording. Expandable up to 14TB via SATA port.
- Cianrochtain: View and manage your system remotely using the free iCSee App (iOS/Android) or VMS Client (Windows/Mac).
- Brath Gluaisne Chliste: Receive mobile push notifications for detected motion types, including person and face detection.
- Socrú Breiseán & Seinn: Easy connection with simultaneous VGA/HDMI output.
2. Socrú agus Suiteáil
2.1 Cad atá sa Bhosca
Sula dtosaíonn tú, déan cinnte go bhfuil na comhpháirteanna uile i láthair:
- 1x A1008 8CH DVR
- 1x 1TB HDD (Pre-installed on DVR)
- 1x DVR Power Adapter
- 1 x Luch USB
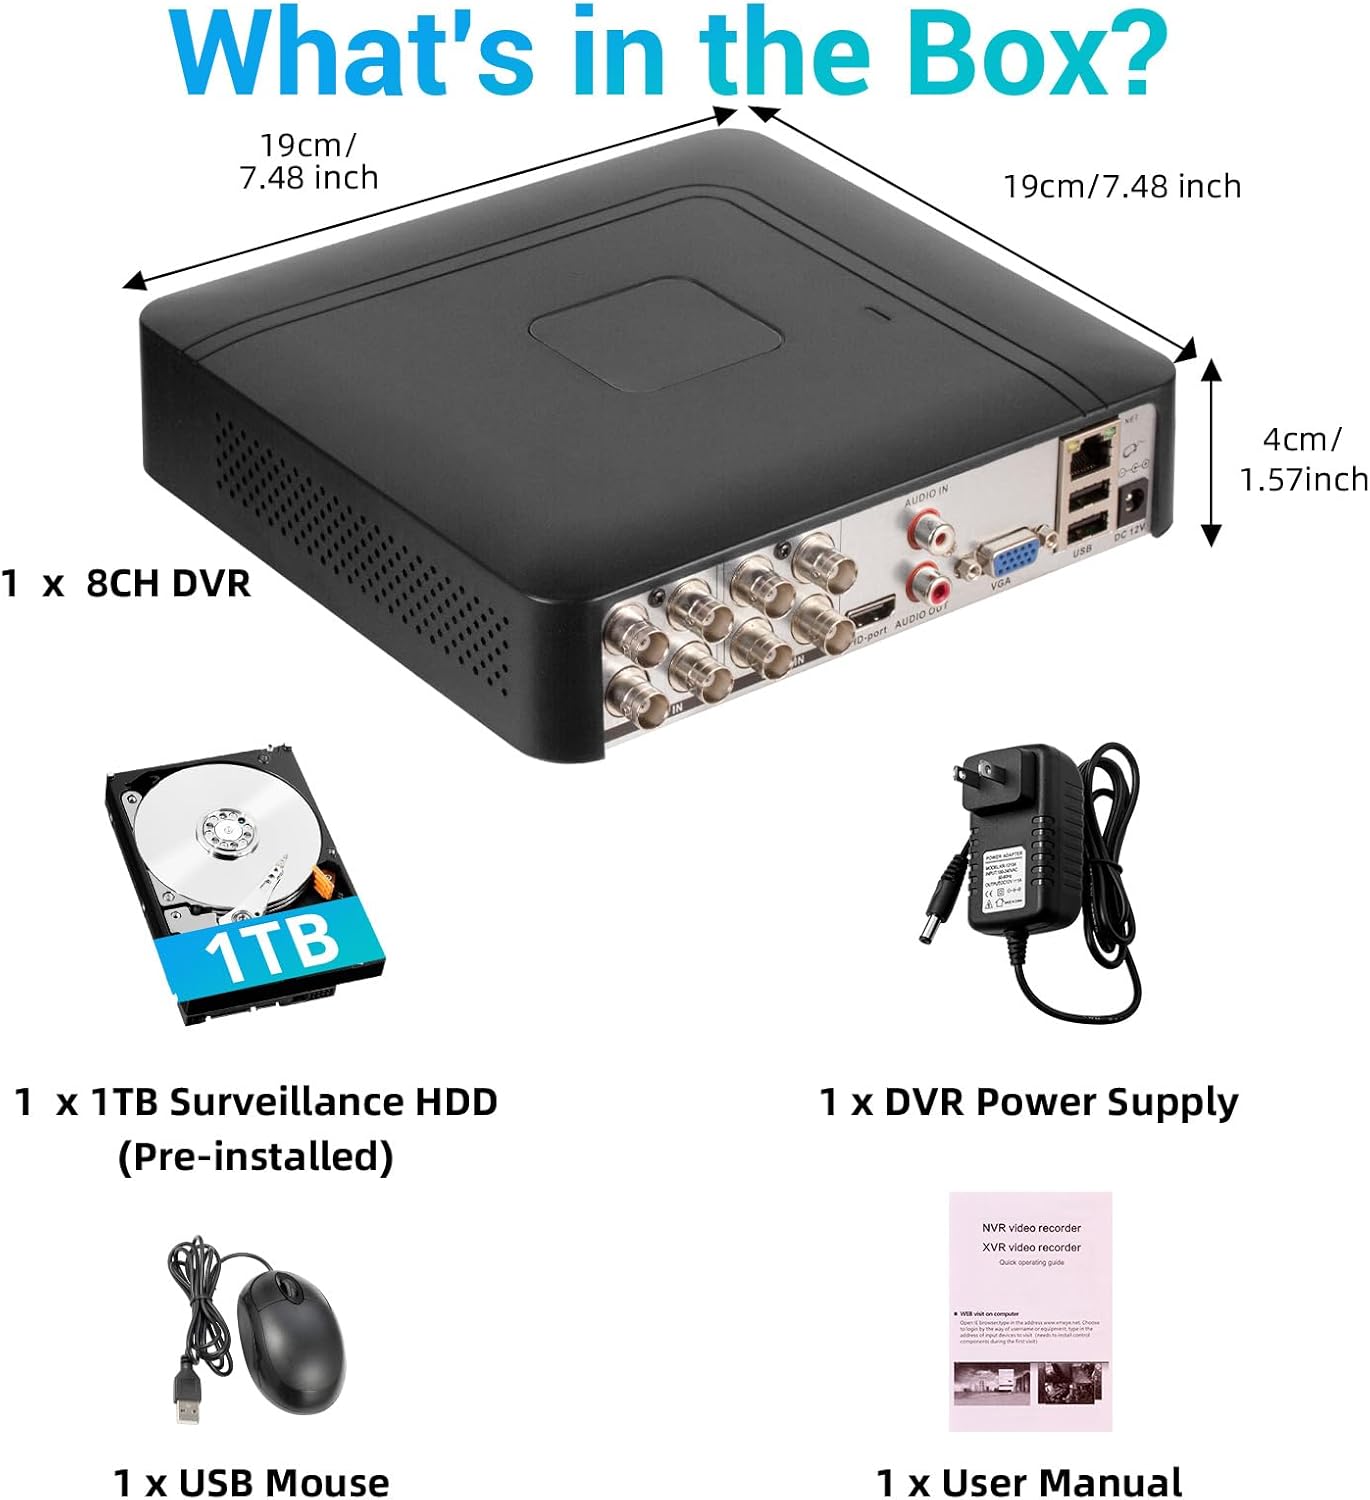
Íomhá 2.1: Ábhar phacáiste an táirge.
2.2 Hard Drive Installation (if not pre-installed or for upgrade)
The DVR comes with a pre-installed 1TB HDD. If you need to replace or upgrade the hard drive (up to 14TB), follow these steps:
- Unscrew the bottom cover of the DVR unit.
- Oscail an c go cúramachasing.
- Connect the SATA data cable and power cable from the DVR to the new hard drive.
- Secure the hard drive within the casing using the provided screws.
- Close the DVR casing and secure it with screws.

Image 2.2: Hard drive installation and expansion options.
2.3 Connecting the DVR System
Lean na céimeanna seo chun do chóras DVR a nascadh:
- Ceangail Ceamaraí: Connect your security cameras to the 'VIDEO IN' ports on the back of the DVR using BNC cables.
- Ceangail Monatóir: Connect a monitor to the DVR using either the HDMI or VGA port.
- Ceangail Luch USB: Plug the included USB mouse into one of the USB ports on the DVR.
- Connect Network (Optional for Remote Access): Le haghaidh iargúlta viewing and notifications, connect an Ethernet cable from your router to the 'NET' port on the DVR.
- Cumhacht ar: Connect the DVR power adapter to the 'DC 12V' port and then plug it into a power outlet.

Image 2.3: Connecting cameras and network to the DVR.
2.4 Initial Setup and Channel Type Selection
Upon first power-on, the system may prompt for initial setup. You may need to select the appropriate channel type for your cameras.
- Right-click on the screen to access the Main Menu.
- Déan nascleanúint chuig Córas > Digiteach > Cineál Cainéal.
- Select the configuration that matches your camera setup:
- First row: Supports 8 XVI, CVBS, AHD, TVI, CVI coaxial cameras.
- Second row: Supports 8 XVI, CVBS, AHD, TVI, CVI coaxial + 4 IP cameras.
- Third row: Supports 16 1080P IP cameras.
- Fourth row: Supports 16 5MP IP cameras.
- Cliceáil OK to apply changes. The system may restart.

Image 2.4: DVR Channel Type selection screen.
3. Treoracha Oibriúcháin
3.1 Beo View agus Taifeadadh
Once the DVR is powered on and cameras are connected, you should see the live feed on your connected monitor. The system is configured for 24/7 recording to the pre-installed 1TB hard drive.

Image 3.1: Live view de bheathaí ilcheamara.
3.2 Rochtain Chianda tríd an Aip Shoghluaiste
To access your DVR remotely, download the free iCSee App (for iOS/Android) or VMS Client (for Windows/Mac).
- Download the iCSee App from your device's app store.
- Oscail an aip agus cláraigh cuntas mura bhfuil ceann agat.
- In the DVR's main menu, navigate to Eolas > Leagan to find the DVR's QR code.
- Use the iCSee app to scan the QR code to add your device.
- Nuair a chuirtear leis, is féidir leat view live feeds, playback recordings, and receive alerts from anywhere with an internet connection.

Image 3.2: Steps for remote access via mobile app.
3.3 Playback Recorded Footage
Le hathview físeán taifeadta:
- Right-click on the screen to access the Main Menu.
- Roghnaigh Taifead > Athsheinm.
- Choose the desired channel(s) and date/time range for playback.
- Cliceáil Tosaigh Athsheinm chuig view an footage.

Image 3.3: Playback interface with timeline.
3.4 Motion Detection Alerts
The DVR supports intelligent motion detection, including person and face detection. When motion is detected, you can receive instant mobile push notifications.
- Configure motion detection settings in the DVR's Aláram roghchlár.
- Ensure your mobile app is properly linked and notifications are enabled.

Image 3.4: Human and face detection in action.
4. Cothabháil
4.1 Bainistíocht Tiomántán Crua
The pre-installed 1TB hard drive provides ample storage. Due to H.265+ compression, storage is optimized. If more storage is needed, you can replace the internal HDD with a larger one (up to 14TB). Regularly check the hard drive status in the DVR's system settings to ensure optimal performance.
4.2 Cúram Ginearálta
- Keep the DVR in a cool, dry, and well-ventilated area.
- Avoid exposing the unit to direct sunlight, extreme temperatures, or moisture.
- Clean the exterior of the DVR with a soft, dry cloth. Do not use liquid cleaners.
- Cinntigh go bhfuil gach nasc cábla slán.
5. Fabhtcheartú
5.1 No Video Output on Monitor
- Check if the DVR is powered on and the power adapter is securely connected.
- Verify the HDMI or VGA cable connection between the DVR and the monitor.
- Cinntigh go bhfuil an monatóir socraithe chuig an bhfoinse ionchuir cheart (HDMI/VGA).
5.2 Ceamaraí Gan Taispeántas
- Check all camera power and video cable connections.
- Verify that the camera type (AHD, TVI, CVI, etc.) is compatible with the DVR.
- Ensure the correct channel type is selected in the DVR settings (refer to Section 2.4).
- Test cameras individually if possible to isolate the issue.
5.3 Remote Access Not Working
- Confirm the DVR is connected to the internet via an Ethernet cable.
- Seiceáil nasc idirlín do ródaire.
- Cinntigh go bhfuil an aip iCSee nuashonraithe go dtí an leagan is déanaí.
- Verify that the DVR was added correctly to the app by scanning the QR code.
- For some networks, you might need to adjust router settings (e.g., port forwarding), consult your network administrator or ISP.
6. Sonraíochtaí
| Gné | Sonraigh |
|---|---|
| Branda | Breoslaí |
| Uimhir Mhúnla | A1008CH |
| Líon Cainéil | 8 |
| Teicneolaíocht Nascachta | HDMI, USB, VGA |
| Gléasanna Comhoiriúnacha | Desktop, Tablet, Camera, Smartphone |
| Toisí Táirge | 7.48"F x 7.48"L x 1.57"A |
| Cumas Stórála Cuimhne | 1 TB (Pre-installed) |
| Hard-Drive Size | 1 TB (Expandable up to 14 TB) |
| Media Format Digital Video | H.265 + |
| Ionchur Físeáin | AHD, CVI, HDMI, HDTVI, IP Input, VGA |
| UPC | 765142240850 |
7. Barántas agus Tacaíocht
7.1 Barántas Táirgí
This Fuers DVR Recorder is covered by a standard manufacturer's warranty. Please refer to the warranty card included with your product or visit the official Fuers websuíomh gréasáin le haghaidh téarmaí agus coinníollacha mionsonraithe an bharántais. Coinnigh d’admháil ceannaigh mar chruthúnas ceannaigh le haghaidh éilimh bharántais.
7.2 Tacaíocht Theicniúil
For technical assistance, troubleshooting, or any questions regarding your Fuers DVR, please contact Fuers customer support. Contact information can typically be found on the product packaging, the official Fuers websuíomh, nó trí do mhiondíoltóir.
Acmhainní Ar Líne:
- Tabhair cuairt ar an Fuers Store on Amazon le haghaidh faisnéise agus nuashonruithe táirgí.