1. Faisnéis Sábháilteachta
Before beginning installation, ensure the power supply is disconnected at the circuit breaker. All wiring must comply with national and local electrical codes. If you are unfamiliar with electrical wiring, consult a qualified electrician. Ensure the mounting structure can support the fan's weight. Maintain a minimum clearance of 7 feet from the floor to the fan blades and 18 inches from the wall to the blade tips. Do not connect the fan to a dimmer switch or fan speed switch, as this can cause operational malfunctions.
2. Ábhar Pacáiste
Deimhnigh go bhfuil na comhpháirteanna uile i láthair sula dtosaíonn tú ar an suiteáil:
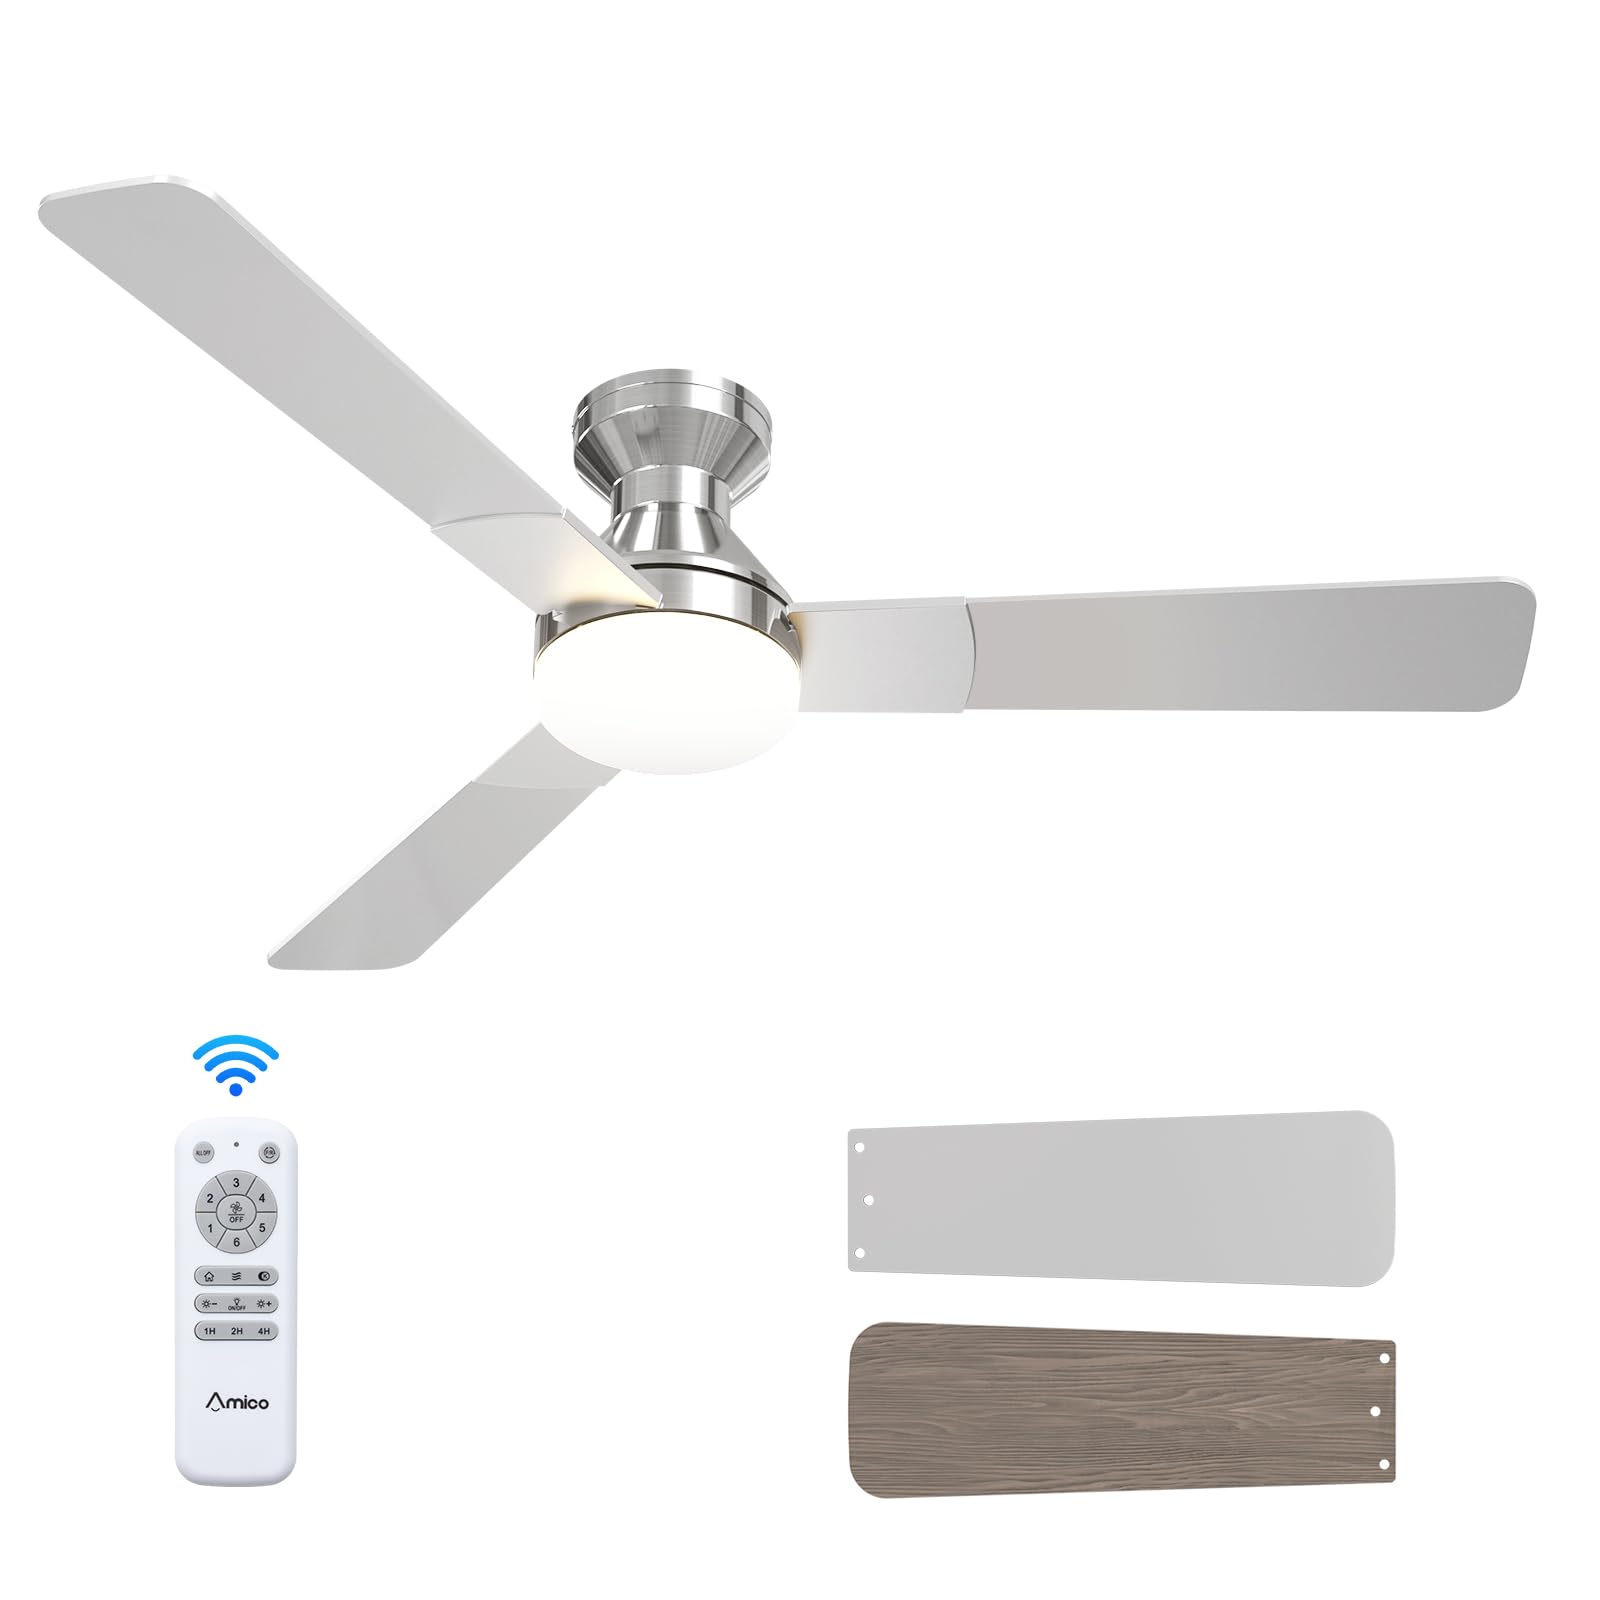
- Aonad Fan Uasteorainn
- ABS Lampscáth
- Light Kit (LED)
- Crua-earraí Gléasta
- Cianrialú

Illustration of various ceiling fan components included in the package.
Díbhosca agus Comhpháirt Thartview
Soláthraíonn an físeán seo níos móview of the Amico ceiling fan components as they are unboxed, highlighting the included parts and instructions for easy installation.
3. Sonraíochtaí Táirge
| Branda | Amico |
| Uimhir Mhúnla | KFM52PLY3B02R1 |
| Méid | 52 Orlach |
| Dath | nicil |
| Toisí Táirge | 52"D x 52"W x 15.7"H |
| Foinse Cumhachta | 120V AC input, DC motor |
| Líon na Lanna | 3 |
| Ábhar Blade | Adhmad Innealtóireachta |
| Cineál Solas | LED (in-athsholáthair) |
| Líon na Luasanna | 6 |
| Leibhéal Torainn | 35 Deicibeil |
| Modh Rialaithe | Cianrialú |
| Úsáid Laistigh / Lasmuigh | Laistigh, Lasmuigh (Damp Rátáilte) |
4. Suiteáil
Follow these steps for a safe and efficient installation of your Amico ceiling fan. It is recommended to have a second person assist during certain stages na suiteála.
4.1 Seiceálacha Réamhshuiteála
- Ensure the power is OFF at the circuit breaker before starting.
- Confirm your ceiling junction box is securely mounted and capable of supporting the fan's weight (at least 35 lbs).
- Bailigh na huirlisí riachtanacha: scriúire, stiallóirí sreinge, téip leictreach, dréimire.

Image illustrating the mounting bracket and electrical wiring connections for installation.
4.2 An Lúibín a Ghléasadh
Attach the mounting bracket to the ceiling junction box using the provided screws. Ensure it is firmly secured to prevent wobbling.

Diagram showing the ceiling fan mounting directly to a standard ceiling junction box for easy DIY installation.
4.3 Sreangú
Connect the fan's electrical wires to the household wiring according to the color codes: Black (Live), White (Neutral), Yellow/Green (Earth). Use wire nuts to secure connections. Ensure all connections are tight and insulated. Important: Do not connect to dimmer switches or fan speed switches to prevent operational malfunctions.

Illustration showing compatible conventional wall switches and incompatible dimmer/fan speed switches.
4.4 Attaching Motor and Blades
Carefully lift the fan motor assembly and attach it to the mounting bracket. Secure it with the designated screws. Then, attach the three fan blades to the motor housing. The blades are reversible, with a nickel finish on one side and an oak grain on the other, allowing you to choose the aesthetic that best suits your decor.

Dún-suas view of the fan motor assembly with reversible blades, showing the nickel and oak grain sides.
4.5 Suiteáil an Trealamh Solais
Connect the LED light kit to the fan's wiring. Secure the light kit to the fan motor assembly using the provided screws. Ensure the connections are firm.
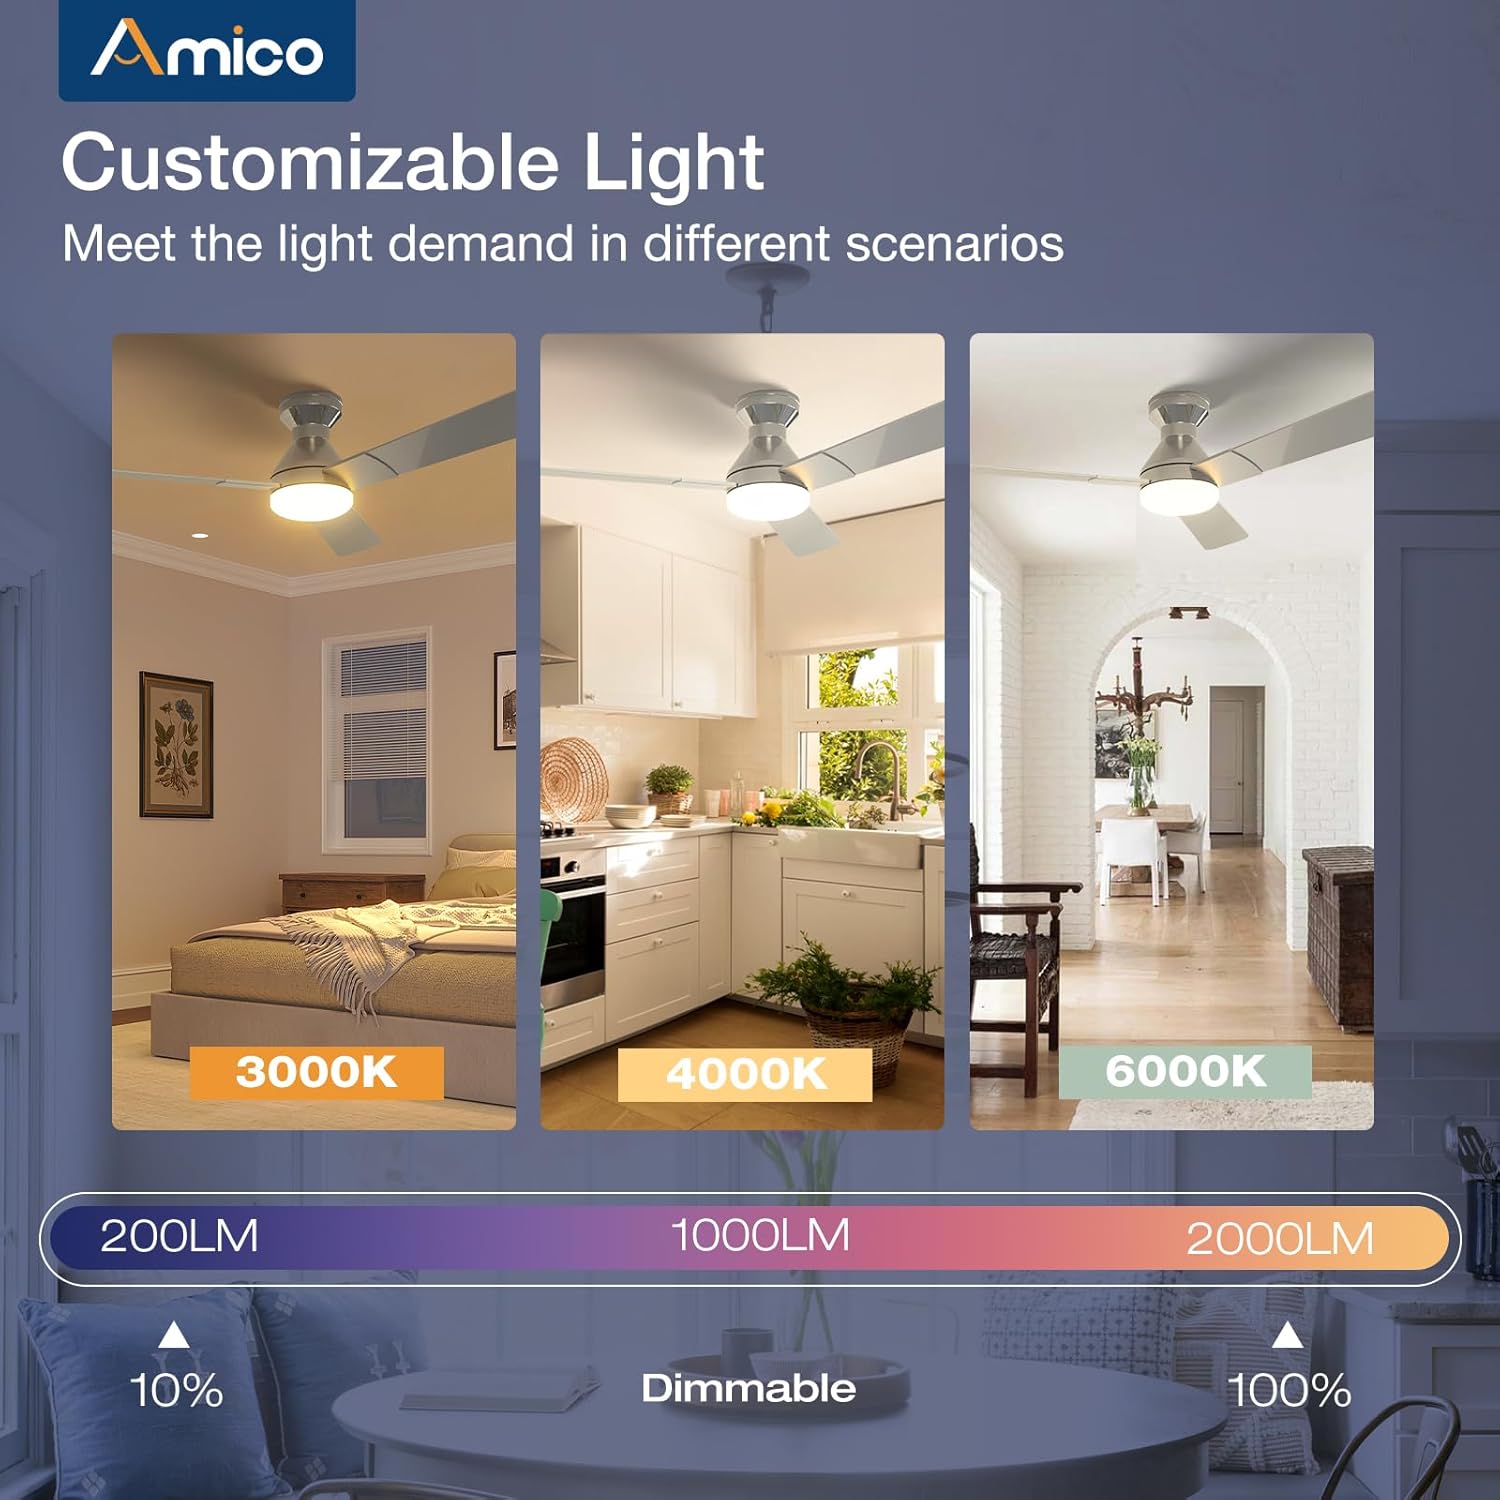
Image detailing the installation of the LED light kit onto the ceiling fan.
4.6 Tionól Deiridh
Ceangail an lampshade or light cover to the light kit, twisting or securing it into place as per the design. Restore power at the circuit breaker and test the fan and light functions using the remote control.

Image showing the final step of attaching the light cover to the ceiling fan.
Treoir maidir le suiteáil físeán
This video demonstrates the installation process, highlighting how easy it is to set up the Amico ceiling fan, even for remodels.
5. Treoracha Oibriúcháin
Your Amico ceiling fan is designed for ease of use with a comprehensive remote control.
5.1 Feidhmeanna Cianrialtáin

Image of the remote control with labeled buttons for various functions.
- Cnaipe Cumhachta: Casann sé an lucht leanúna agus an solas air/as.
- Luas an lucht leanúna (1-6): Adjusts fan speed from gentle breeze (1) to strong wind (6).
- Feidhm Droim ar Ais: Changes the direction of blade rotation for summer (downward airflow) or winter (upward airflow) use.
- Solas Ar / As: Casann sé an solas go neamhspleách.
- Light Brightness (+/-): Dims or brightens the light (10%-100%).
- Teocht Dath: Cycles through 3000K (warm white), 4000K (natural white), and 6000K (cool white).
- Timer (1H, 2H, 4H): Sets the fan and/or light to turn off automatically after the selected duration.
Remote Control Demonstration
This video demonstrates the various functions of the remote control, including fan speed, light temperature, and dimming capabilities.
5.2 Luas an Lucht leanúna agus Sreabhadh Aeir
The fan offers 6 adjustable speeds to suit your comfort needs, from a gentle, comfortable breeze to a strong cooling wind. The DC motor ensures powerful yet quiet operation.

Diagram illustrating the 6 adjustable fan speeds and their corresponding wind levels.
5.3 Customizable Light
The integrated LED light is dimmable from 10% to 100% and offers three color temperature options: 3000K (warm), 4000K (natural), and 6000K (cool). Adjust the light to match your activity or mood.
Image showing the three color temperature options (3000K, 4000K, 6000K) and dimmable range of the fan light.
5.4 Mótar DC Inchúlaithe
The reversible DC motor allows you to change the direction of the fan blades. In summer, set the fan to rotate counter-clockwise for a downward airflow that creates a cooling effect. In winter, set it to rotate clockwise for an upward airflow that helps circulate warm air trapped near the ceiling.

Diagram illustrating the summer (cooling) and winter (warming) modes of the reversible DC motor.
5.5 Socrú an lasc ama
Utilize the timer function to automatically turn off the fan and/or light after 1, 2, or 4 hours, promoting energy efficiency and convenience, especially during sleep.

Graphic showing the 1-hour, 2-hour, and 4-hour timer settings for the fan.
5.6 Feidhm Cuimhne
The fan and light feature memory functions. Once you select your desired light brightness, color temperature, and fan speed, these settings will be retained even after turning the unit off and on via the wall switch. This avoids the need to reset your preferences each time.

Illustration demonstrating how the fan and light settings are remembered after being turned off and on.
5.7 Oibriú Ciúin
Engineered for minimal noise, the fan operates at a low 35dB, comparable to the sound of falling leaves, ensuring a quiet living environment suitable for bedrooms and nurseries.

Graphic comparing the fan's low noise level (35dB) to common ambient sounds.
6. Cothabháil
Cinntíonn cothabháil rialta feidhmíocht agus fad saoil is fearr do lucht leanúna síleála.
- Glanadh: Glan lanna an lucht leanúna agus tithíocht an mhótair go tréimhsiúil le clúdach bog, tirim.amp éadach. Ná húsáid glantóirí nó tuaslagóirí scríobach.
- Clúdach Solais: The ABS lampshade can be removed and cleaned with mild soap and water. Ensure it is completely dry before reattaching.
- Scriúnna Lanna: Check all blade attachment screws periodically to ensure they are tight.
- Trealamh Solais LED: The LED light kit is replaceable. If replacement is needed, contact customer support for compatible parts.
7. Fabhtcheartú
If you encounter any issues with your Amico ceiling fan, refer to the following common troubleshooting steps:
- Ní thosaíonn an lucht leanúna:
- Check that power is supplied to the fan.
- Cinntigh go bhfuil gach nasc sreinge slán.
- Verify the remote control batteries are functional and correctly inserted.
- Ní Oibríonn an Solas:
- Check the light kit's electrical connections.
- Cinntigh go bhfuil an fheidhm solais ar an gcianrialtán gníomhachtaithe.
- Creathadh lucht leanúna:
- Ensure the mounting bracket is securely fastened to the ceiling junction box.
- Check that all blade screws are tightened.
- Verify blades are not bent or damaged.
- Cianrialtán Neamhfhreagartha:
- Cuir na cadhnraí cianrialaithe in ionad.
- Cinntigh nach bhfuil aon bhacainní idir an cianrialtán agus glacadóir an lucht leanúna.
8. Barántas agus Tacaíocht
Amico is committed to customer satisfaction. Your ceiling fan comes with a Barántas 24 mhí gan imníCuirimid ar fáil freisin Tacaíocht theicniúil 24 uair an chloig to assist with any issues during use or installation.
Eolas Teagmhála:
- Ríomhphost: tacaíocht@amicolight.com
- Fón: +1 (888) 676-1042 (Monday - Friday from 9:00 AM - 5:00 PM PT)

Graphic detailing Amico's after-sales support and warranty information.