1. Réamhrá
The Generic JM300PRO is a wireless video transmission system designed for professional videographers, photographers, and filmmakers. It consists of a transmitter (TX) and a receiver (RX) unit, enabling high-definition video and audio signal extension up to 200 meters (656 feet) with a low latency of approximately 0.06 seconds. This system supports 1080P60Hz resolution and offers multiple power supply options, app monitoring, and multi-receiver capabilities.
2. Ábhar Pacáiste
Deimhnigh go bhfuil na hearraí go léir i do phacáiste:
- JM300PRO Transmitter Unit (TX)
- JM300PRO Receiver Unit (RX)
- Antennas (typically 2 per unit)
- Cuibheoir Cumhachta (má tá sé san áireamh)
- Lámhleabhar Úsáideora (an doiciméad seo)
Nóta: Batteries (e.g., NP-F series) are not included and must be purchased separately.
3. Gléas Tharview

Fíor 3.1: JM300PRO Transmitter Unit (TX). This unit sends the video signal from your source device.

Fíor 3.2: JM300PRO Receiver Unit (RX). This unit receives the video signal and outputs it to a display.
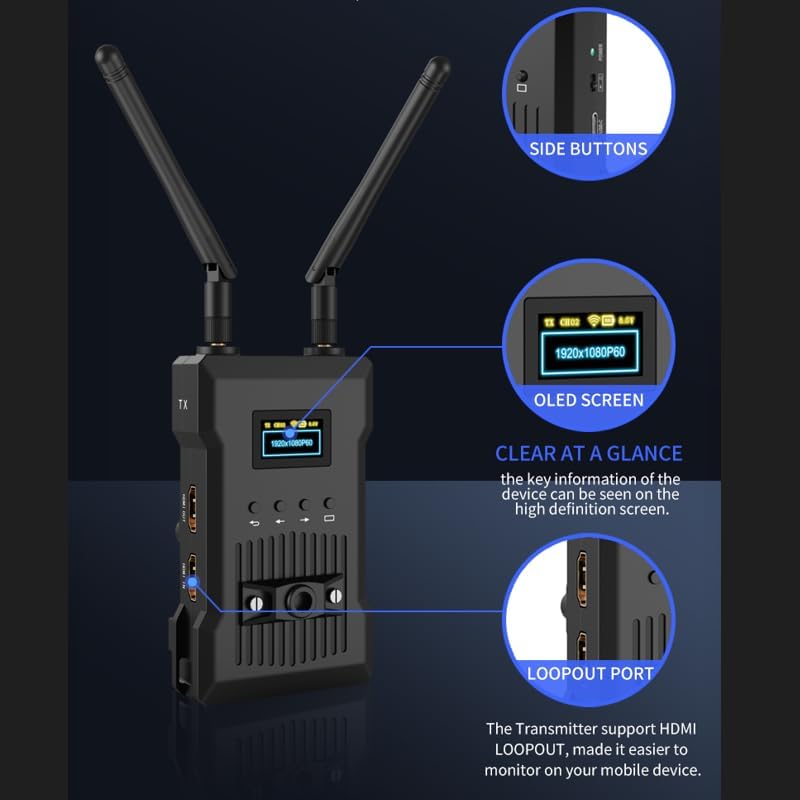
Fíor 3.3: Key features of the JM300PRO unit, including the OLED screen for status display, side buttons for navigation, and the HDMI loopout port.
3.1 Calafoirt agus Táscairí
- HDMI IN (TX Unit): Connects to your video source (e.g., camera, camcorder).
- HDMI OUT (TX Unit): Provides a loopout for local monitoring on the transmitter.
- HDMI OUT 1 & 2 (RX Unit): Connects to display devices (e.g., monitors, TVs).
- DC 9-16V: Port ionchuir cumhachta.
- USB-C: Alternative power input port.
- Cnaipe Cumhachta: Casadh an t-aonad ar / as.
- Scáileán OLED: Displays status information such as resolution, signal strength, and battery level.
- Cnaipí Rialaithe: Used for menu navigation and channel selection.

Fíor 3.4: Taobh view of the JM300PRO unit, highlighting the DC 9-16V power input, USB-C port, and power button.
4. Treoracha Socraithe
4.1 Suiteáil Antenna
- Carefully screw the provided antennas onto the antenna connectors on both the Transmitter (TX) and Receiver (RX) units.
- Ensure the antennas are securely tightened but do not overtighten.
- Adjust the antennas to an upright position for optimal signal transmission.
4.2 Cumhachtú na nAonad
The JM300PRO supports three power supply methods:
- DC 9-16V Power Adapter: Connect the included power adapter to the DC 9-16V port on the unit and plug it into a power outlet.
- Ceallraí Sraith NP-F: Attach a compatible NP-F series battery to the battery plate on the rear of the unit. (Batteries sold separately).
- Cumhacht USB-C: Connect a USB-C power source to the USB-C port.

Fíor 4.1: The JM300PRO offers flexible power options including NP-F batteries, DC input, and USB-C.
4.3 Gléasanna a Nascadh
- Aonad Tarchuradóra (TX): Connect your video source (e.g., camera, camcorder, DVD player, set-top box) to the HDMI-IN port on the TX unit using an HDMI cable. If local monitoring is desired, connect an external monitor to the HDMI AMACH (loopout) port on the TX unit.
- Aonad Glacadóra (RX): Connect your display device(s) (e.g., HDTV, projector, monitor) to the HDMI AMACH 1 or HDMI AMACH 2 ports on the RX unit using HDMI cables. The RX unit supports connecting up to two HD monitors simultaneously.
5. Treoracha Oibriúcháin
5.1 Cumhacht ar siúl / as
Press and hold the Power button on each unit until the OLED screen illuminates (for power on) or turns off (for power off).
5.2 Ceangal Tosaigh
Once both the TX and RX units are powered on and connected to their respective devices, they should automatically establish a connection. The OLED screen on both units will display the current resolution (e.g., 1920x1080P60) and signal status.
5.3 Channel Scan and Selection
The JM300PRO features a channel scan function to identify the best available wireless channel for optimal performance. This can be done via the unit's control buttons or through the dedicated mobile application.
- Ar an ngléas: Use the control buttons next to the OLED screen to navigate the menu and initiate a channel scan. Select a channel with minimal interference.
- Tríd an Aip: Download and install the JM300PRO monitoring application on your smartphone or tablet. Connect your mobile device to the JM300PRO's Wi-Fi network. Within the app, you can perform a channel scan and select the most suitable frequency point. The system offers nine optional frequency points.

Fíor 5.1: The JM300PRO allows selection from nine frequency points to optimize wireless performance.
5.4 APP Monitoring
The mobile application allows for real-time monitoring of the video feed and system status. It also provides control over various settings and enables system upgrades.
- Ensure your smartphone or tablet is connected to the JM300PRO's Wi-Fi network.
- Open the JM300PRO application.
- The app will display the video feed and system information.

Fíor 5.2: The mobile application provides a comprehensive interface for monitoring and controlling the JM300PRO system.
5.5 Multi-Receiver Operation
One JM300PRO Transmitter unit can broadcast to multiple Receiver units (up to 4). To use this feature, simply power on and connect additional RX units as described in Section 4.3. All connected RX units will receive the same video signal from the TX unit.
6. Cothabháil
6.1 Glanadh
Wipe the units with a soft, dry cloth. Do not use liquid cleaners or solvents, as they may damage the device.
6.2 Nuashonrú Firmware
System upgrades can be performed through the mobile application. Ensure the unit has sufficient power and a stable connection during the upgrade process. Follow the instructions provided within the app for a successful update.
6.3 Cúram Ceallraí
If using NP-F series batteries, ensure they are charged according to the battery manufacturer's instructions. Remove batteries from the unit if it will not be used for an extended period.
7. Fabhtcheartú
| Fadhb | Cúis Féideartha | Réiteach |
|---|---|---|
| Gan aon chomhartha físe ar an nglacadóir. |
|
|
| Poor video quality or dropped frames. |
|
|
| App monitoring not working. |
|
|
8. Sonraíochtaí
| Gné | Sonraíocht |
|---|---|
| Uimhir Mhúnla | JM300PRO |
| Branda | cineálach |
| Teicneolaíocht Nascachta | HDMI, Wi-Fi |
| Cineál Rialaitheora | Push Button, App |
| Rún Max | 1080P60Hz |
| Lagacht | Thart ar 0.06s |
| Raon Tarchuir | 200m / 656 troigh (gan bhacainní) |
| Gléasanna Comhoiriúnacha | Personal Computer, Smartphone, Speaker, Tablet, Television, DVD, DVR, IPTV, CCTV Blu-ray players, set-top boxes, cable/satellite boxes, game consoles |
| Poirt Iomlán HDMI | 2 (1 IN, 1 OUT on TX; 2 OUT on RX) |
| Modh Aschuir Fuaime | Steirió |
| Cumraíocht Cainéal Fuaime Timpeallachta | 5.1, 7.1 |
| Ionchódú Físeáin | H.264, H.265/HEVC |
| Cumhacht Aschuir | 5 Watts |
| Ionchur Cumhachta | DC 9-16V, USB-C, NP-F series batteries |
| Líon Cainéil | 6 (Gan sreang) |
| Dath | Dubh |
| Monaróir | Shenzhen liangtu technology co., ltd. |
9. Barántas agus Tacaíocht
Chun eolas faoi bharántas agus tacaíocht theicniúil a fháil, féach ar an doiciméadacht a cuireadh ar fáil le do cheannachán nó déan teagmháil dhíreach leis an díoltóir. Coinnigh do chruthúnas ceannaigh le haghaidh aon éilimh bharántais.

