REXING H6
Lámhleabhar Úsáideora Ceamara Conaire Dúbailte REXING Woodlens H6
Múnla: H6
1. Réamhrá
The REXING Woodlens H6 is an advanced dual-camera trail camera designed for capturing high-quality video and still images of wildlife, property, or other outdoor subjects. Featuring both a 4K Ultra HD lens for daytime recording and an FHD Infrared lens for night vision, the H6 ensures clear visuals in various lighting conditions. Its robust, weather-resistant design and long standby time make it an ideal solution for extended outdoor surveillance.
2. Táirge Tharview agus Príomhghnéithe
- Córas Ceamara Dúbailte: Captures 4K Ultra HD video during the day and FHD Infrared video at night with simultaneous audio recording. Designed to avoid IR CUT switching sounds that might disturb wildlife.
- Íomháú Ardtaifigh: Supports up to 20MP still images and cinematic video quality.
- Integrated LCD & Speaker: Features a built-in 2.4-inch LCD screen and speaker for direct viewing and editing of recordings without external devices.
- Ardfhís Oíche: Equipped with 35M IR Flash and double 850nm high-powered Infrared lights, illuminating subjects up to 65 feet away for clear night images.
- Luas Truicear Tapa: Responds to motion within 0.2 seconds via 110° PIR sensors (Front + Side Sensor).
- Flexible Recording Options: Allows manual scheduling for recording start/stop times and supports time-lapse videos and photos.
- Durable and Secure Design: IP66 rated sturdy open/close case protects against rain and dust. The camera can be password-protected and secured with a lock.
- Fuireachas Sínte: Supports up to 512GB SD card and offers up to 12 months of standby time.

Fíor 2.1: Tosaigh view of the REXING Woodlens H6 Trail Camera, showcasing its camouflage design and dual lenses.

Figure 2.2: The REXING Woodlens H6 captures stunning 4K UHD video and 20MP photos, as demonstrated by this image of a deer in its natural habitat.
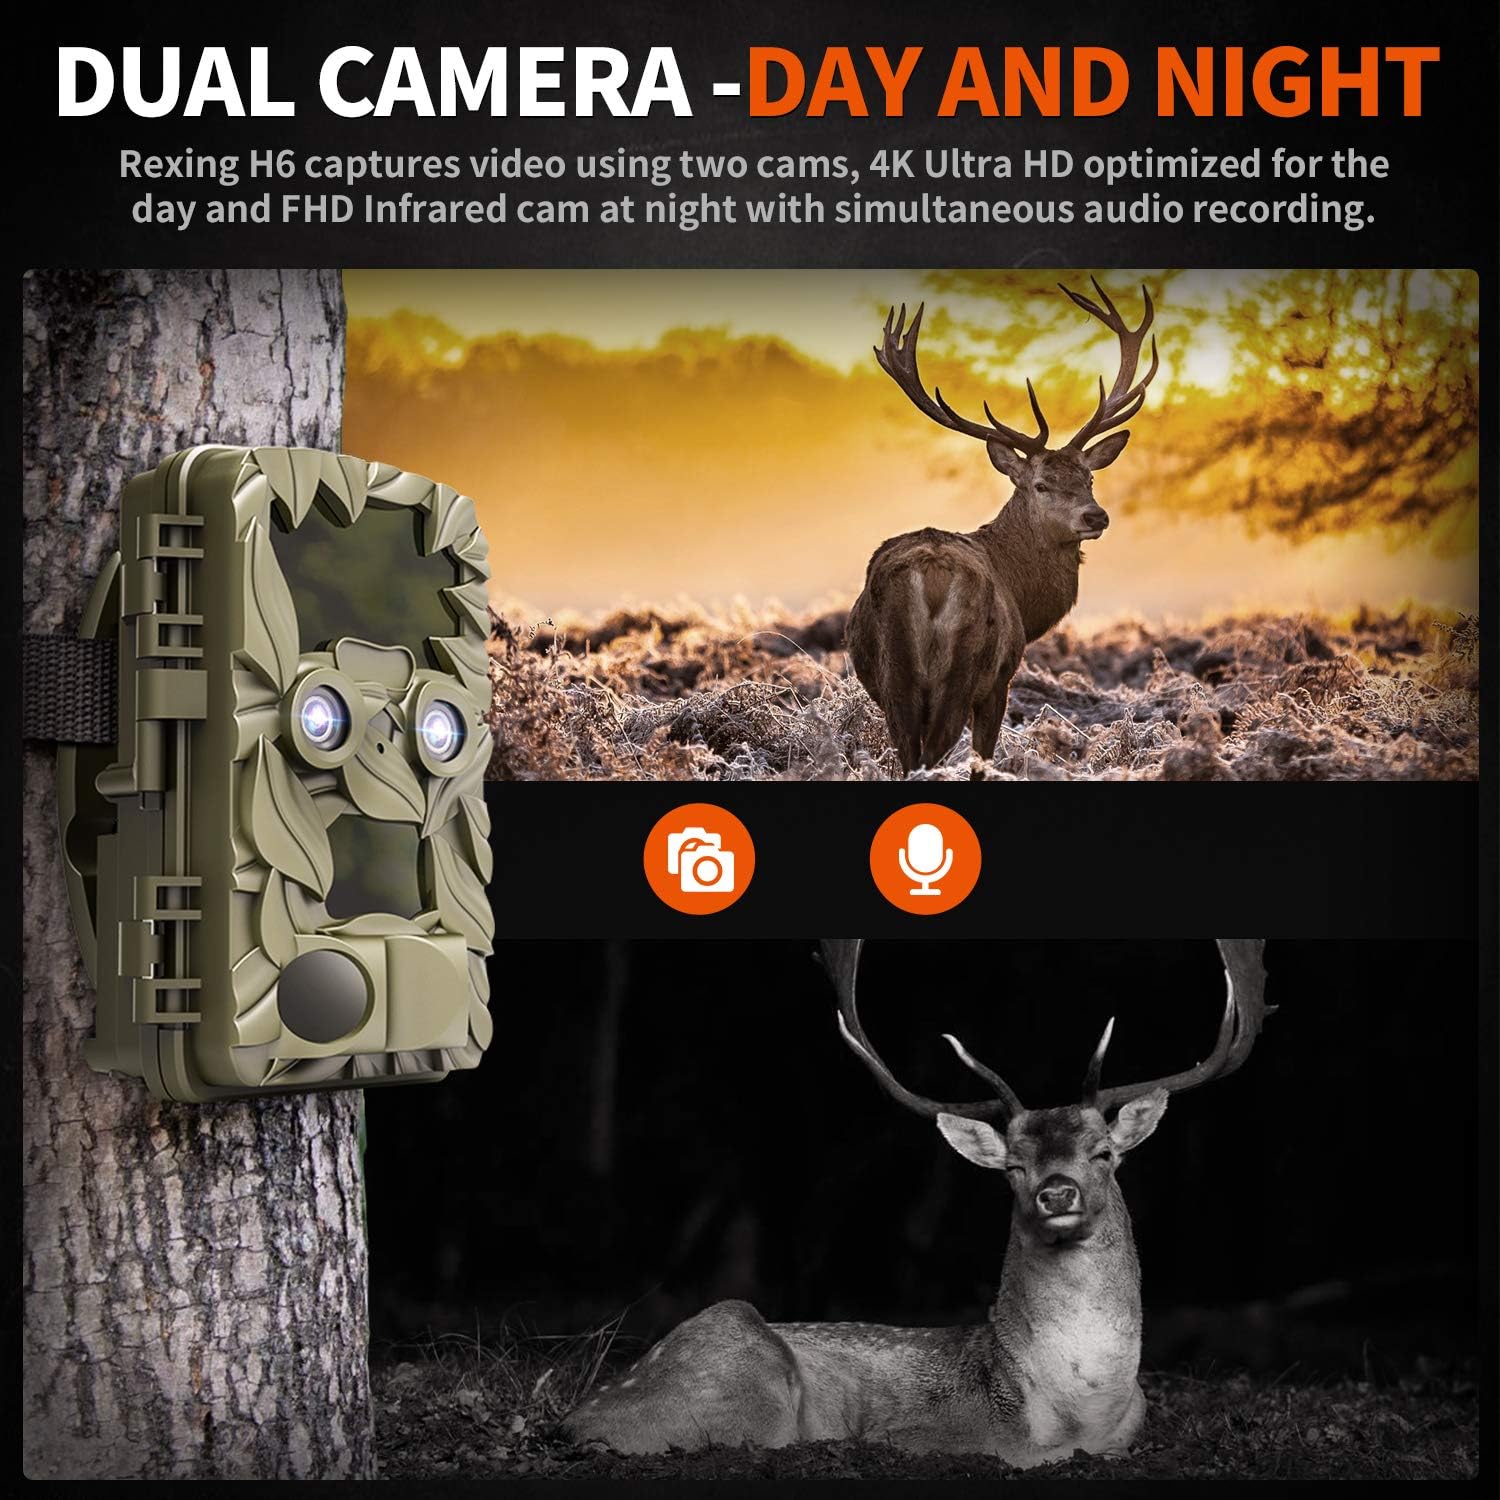
Figure 2.3: The H6 features a dual camera system, optimized for both day (4K) and night (FHD Infrared) recording, ensuring comprehensive surveillance around the clock.

Figure 2.4: Enhanced night vision capabilities of the H6, capturing clear images of wildlife up to 35 meters away in low light conditions, without disturbing sounds.

Figure 2.5: The H6 boasts a 120-degree detection angle and an ultra-fast 0.2-second trigger speed, ensuring no motion is missed.

Figure 2.6: Built to withstand the elements, the H6 is IP56 rated, making it resistant to heavy rain, ice, snow, dust, and mud.

Figure 2.7: The H6 is designed for low power consumption, compatible with 8x AA batteries, providing up to 12 months of standby time.

Figure 2.8: The REXING Woodlens H6 is versatile, suitable for multiple applications including wildlife monitoring, farm surveillance, and security.
3. Ábhar Pacáiste
Seiceáil ábhar an phacáiste le do thoil chun a chinntiú go bhfuil na hearraí go léir i láthair:
- REXING Woodlens H6 Trail Camera
- Strap Gléasta
- Cábla USB
- AV Cábla
- Lámhleabhar Úsáideora
- (Optional: 8x AA Batteries - check product packaging)
4. Socrú
4.1 Suiteáil Battery
- Open the camera's outer casing trí na gearrthóga taobh a dhíghlasáil.
- Aimsigh an urrann ceallraí.
- Insert 8x AA batteries, ensuring correct polarity (+/-) as indicated inside the compartment.
- Dún an clúdach urrann ceallraí go daingean.
4.2 Cárta SD a Chur Isteach
- Agus an ceamara oscailte, aimsigh an sliotán cárta SD.
- Insert a compatible SD card (up to 512GB) into the slot until it clicks into place. Ensure the card is inserted in the correct orientation.
- It is recommended to format the SD card via the camera's menu before first use.
4.3 An Ceamara a Mhéadú
- Select a suitable location for the camera, such as a tree or pole, ensuring a clear view den limistéar atá ag teastáil.
- Snáithigh an strap gléasta atá ar fáil trí na sliotáin ar chúl an cheamara.
- Securely fasten the strap around the tree or pole, adjusting the camera's angle as needed.
- Alternatively, the camera can be wall-mounted using appropriate hardware (not included) via the mounting point.
4.4 Cumhacht Tosaigh Ar
- After installing batteries and SD card, switch the camera to the "ON" position.
- The LCD screen will power on, and you can begin configuring settings.
5. Treoracha Oibriúcháin
5.1 Nascleanúint an Roghchláir
Use the control buttons (MENU, UP, DOWN, LEFT, RIGHT, OK, SHOT) located next to the LCD screen to navigate through the camera's settings and modes.
- MENU: Rochtain ar an bpríomh-roghchlár socruithe.
- SUAS SÍOS: Nascleanúint trí roghanna roghchláir.
- CLÉ DEIS: Adjusts values or selects sub-options.
- OK: Deimhníonn an roghnúchán.
- SHOT: Manually takes a photo or starts/stops video recording in preview mód.
5.2 Modhanna Taifeadta
The H6 supports various recording modes:
- Mód Grianghraf: Captures still images (up to 20MP).
- Mód Físeáin: Records video (4K UHD day, FHD night).
- Mód Grianghraf + Físeáin: Captures a still image followed by a video clip upon detection.
- Mód Chuig Ama: Captures photos or videos at set intervals to create time-lapse sequences.
5.3 Setting Up Scheduled Recording
To set specific times for the camera to operate:
- Cuir isteach an MENU.
- Navigate to the "Timer" or "Schedule" setting.
- Set the desired start and end times for recording. The camera will only be active during these periods.
5.4 Viewing and Managing Recordings
Is féidir le taifeadtaí viewed directly on the camera or on an external device:
- On-Camera Playback: Use the built-in 2.4-inch LCD screen and navigation buttons to review grianghraif agus físeáin a gabhadh.
- Ceangal Teilifíse: Connect the camera to a TV using the provided AV cable to view recordings on a larger screen.
- Ceangal Ríomhaireachta: Connect the camera to a computer via the USB cable, or remove the SD card and insert it into a card reader, to transfer and view files.
5.5 Cosaint Pasfhocal
To prevent unauthorized access to your camera settings and recordings:
- Cuir isteach an MENU.
- Navigate to the "Password" or "Security" setting.
- Set a 4-digit PIN. Remember this PIN as it will be required to access the camera.
Video 5.1: Official product video demonstrating the features and operation of the REXING Woodlens H6 Trail Camera, including its dual lens capabilities, night vision, and user interface.
6. Cothabháil
- Glanadh: Use a soft, dry cloth to clean the camera body and lenses. Avoid abrasive cleaners or solvents.
- Athsholáthar Ceallra: Replace all batteries simultaneously when the low battery indicator appears to ensure optimal performance and prevent leakage.
- Bainistíocht Cártaí SD: Regularly back up important recordings and format the SD card periodically to maintain optimal recording performance and prevent data corruption.
- Stóráil: Nuair nach bhfuil sé in úsáid ar feadh tréimhsí fada, bain na cadhnraí agus stóráil an ceamara in áit fhionnuar tirim amach ó sholas díreach na gréine.
7. Fabhtcheartú
| Fadhb | Cúis Féideartha | Réiteach |
|---|---|---|
| Ní lasann an ceamara. | Ceallraí ísle nó marbha; suiteáil mhícheart ceallraí. | Replace all batteries with new ones, ensuring correct polarity. |
| Camera stops functioning after installation / No data recorded. | SD card full or corrupted; incorrect SD card insertion; camera settings preventing recording. | Format the SD card (backup data first); ensure SD card is properly inserted; check recording mode and schedule settings. Ensure sufficient battery power. |
| Droch-chaighdeán íomhá/físe san oíche. | IR lights obstructed; subject too far; low battery affecting IR performance. | Ensure clear line of sight for IR lights; position camera closer to subjects (within 65ft); replace batteries. |
| Camera not triggering motion. | PIR sensor obstructed; sensitivity setting too low; subject outside detection range. | Clear obstructions from PIR sensors; increase PIR sensitivity in settings; ensure subjects pass within the 110° detection angle. |
| Camera screen counts down and switches off. | This is normal behavior for the camera to enter monitoring mode after a brief display. | No action required. The camera is functioning as designed. |
| Gan nascacht Wi-Fi. | The REXING Woodlens H6 model does not feature Wi-Fi connectivity. | This model requires direct connection via AV/USB cable or SD card removal for data transfer. |
8. Sonraíochtaí
| Gné | Sonraigh |
|---|---|
| Branda | REXING |
| Múnla | H6 |
| Rún Gabhála Físeáin | 2160p (4K UHD) |
| Rún Fós Éifeachtach | 20 MP |
| Teicneolaíocht Braiteoir Grianghraf | CMOS |
| Fís Oíche | 35M IR Flash, Double 850nm High Powered Infrared Light |
| Uillinn Braite PIR | 110° (Front + Side Sensor) |
| Luas truicear | 0.2 soicind |
| Taispeáin | Built-in 2.4-inch LCD |
| Stóráil | Cárta SD (suas le 512GB) |
| Foinse Cumhachta | 8x AA Batteries (12 Month Standby) |
| Nascacht | AV Output, USB |
| Rátáil Idirnáisiúnta um Chosaint | IP66 |
| Toisí Pacáiste Mír | 7.68 x 4.92 x 3.9 orlach |
| Meáchan Pacáiste | 0.61 cileagram |
| UPC | 810046601815 |
9. Barántas agus Tacaíocht
For warranty information and technical support, please refer to the official REXING websuíomh gréasáin nó déan teagmháil dhíreach lena seirbhís do chustaiméirí. Coinnigh d’admháil ceannaigh mar chruthúnas ceannaigh i gcás aon éilimh bharántais.
Eolas Teagmhála:
- Websuíomh: www.rexingusa.com (Deimhnigh an t-oifigeach le do thoil website for the most current information)
- Ríomhphost: Déan tagairt don websuíomh le haghaidh ríomhphoist tacaíochta.
- Fón: Déan tagairt don websuíomh le haghaidh uimhir theileafóin tacaíochta.
Ask a question about this manual
Ask about setup, troubleshooting, compatibility, parts, safety, or missing instructions. Manuals+ will review the question and use this page’s manual context to help answer it.