1. Réamhrá
This manual provides essential instructions for the installation, operation, maintenance, and troubleshooting of your Juniper EX2200-C-12T-2G Layer 3 Switch. Please read this manual thoroughly before using the device to ensure proper functionality and safety. The Juniper EX2200-C-12T-2G is a compact, fanless, and power-efficient platform designed for low-density micro branch deployments, commercial access, or enterprise workgroup environments.
2. Táirge Tharview
2.1. Príomhghnéithe
- Silent and power-efficient operation.
- Compact and fanless form factor.
- Layer 3 switching capabilities.
- 12 x 1000Base-T RJ-45 ports.
- 2 x SFP ports.
- Runs on Junos Operating System.
2.2. Ábhar Pacáiste
Deimhnigh go bhfuil na míreanna uile i láthair sa phacáiste:
- Juniper EX2200-C-12T-2G Layer 3 Switch
- Cábla cumhachta
- 12 x 1000Base-T RJ-45 cables (Ethernet cables)
- 2 x SFP cables
2.3. Cur síos Fisiciúil
The Juniper EX2200-C-12T-2G switch features a robust design with various ports and indicators on its front panel.
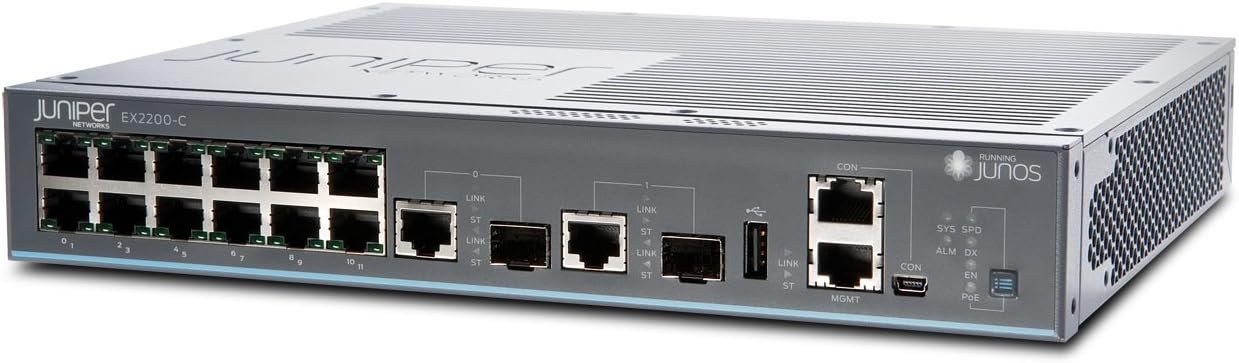
Fíor 1: Tosaigh view of the Juniper EX2200-C-12T-2G Layer 3 Switch. This image displays the front panel of the switch, highlighting the 12 RJ-45 Ethernet ports, two SFP uplink ports, console ports (RJ45 and Mini-USB), and various status LEDs including SYS, SPD, ALM, DX, CON, EN, and PoE indicators.

Fíor 2: Aghaidh mhalartach view of the Juniper EX2200-C-12T-2G Layer 3 Switch. This perspective offers a clearer view of the port numbering (0-11 for RJ-45 ports) and the labeling of the SFP ports and management interfaces.
3. Socrú
3.1. Ullmhúchán Suímh
- Timpeallacht: Place the switch in a clean, dry, and well-ventilated area. Ensure the ambient temperature does not exceed 40 degrees Celsius.
- Gléasta: The compact design allows for desktop placement or wall mounting (mounting hardware not included).
- Foinse Cumhachta: Connect the switch to a reliable power outlet using the provided power cable. The switch operates on 230 Volts.
3.2. Connecting the Switch
- Ceangal Cumhachta: Connect the power cable to the switch's power inlet and then to an appropriate electrical outlet.
- Naisc Líonra:
- Poirt RJ-45: Use the provided 1000Base-T RJ-45 cables to connect network devices (computers, servers, other switches) to the 12 Ethernet ports (labeled 0-11) on the front panel.
- Poirt SFP: Insert SFP transceivers (if required) into the two SFP ports and connect fiber optic cables for uplink or high-speed connections.
- Console Connection (Initial Configuration): For initial configuration and management, connect a serial cable from your management workstation to the CON (console) port on the switch. Alternatively, a Mini-USB console port is also available.
4. Treoracha Oibriúcháin
4.1. Cumhachtú Ar
Once the power cable is connected, the switch will automatically power on. The boot process for the Junos OS may take several minutes.
4.2. Táscairí LED
Monitor the front panel LEDs for operational status:
- SYS (System): Indicates the overall system status. Typically solid green for normal operation.
- Luas (SPD): Indicates the link speed of the connected port.
- ALM (Aláram): Indicates an alarm condition. Refer to the Junos OS documentation for specific alarm codes and troubleshooting.
- DX (Duplex): Indicates the duplex mode of the connected port.
- CON (Console): Indicates activity on the console port.
- EN (Enable): Táscaire stádais.
- PoE (Cumhacht thar Ethernet): If applicable, indicates PoE status for ports. (Note: This model does not explicitly list PoE as a feature, but the LED is present).
4.3. Cumraíocht
The Juniper EX2200-C-12T-2G switch is managed using the Junos Operating System via a Command Line Interface (CLI). Access the CLI through the console port or via SSH after initial network configuration. Refer to the official Juniper Networks Junos OS documentation for detailed configuration procedures, including VLAN setup, routing protocols, and security settings.
5. Cothabháil
5.1. Cúram Ginearálta
- Keep the switch clean and free from dust. Use a soft, dry cloth for cleaning.
- Ensure adequate airflow around the device, even though it is fanless, to prevent heat buildup.
- Seachain an lasc a nochtadh do theocht mhór, taise nó solas díreach na gréine.
5.2. Nuashonruithe Firmware
Seiceáil tacaíocht Juniper Networks go tréimhsiúil website for available Junos OS updates. Applying updates can improve performance, add new features, and address security vulnerabilities. Follow the instructions provided by Juniper Networks for safe firmware upgrade procedures.
6. Fabhtcheartú
6.1. Saincheisteanna Cumhachta
- Gan Cumhacht: Verify the power cable is securely connected to both the switch and the power outlet. Check the power outlet with another device.
6.2. Fadhbanna Nascachta
- Gan Nasc: Check the Ethernet or fiber optic cables for secure connections and damage. Verify the connected device is powered on and functioning correctly. Observe the port's Link/Activity LED.
- Ceangal Mall: Ensure cables are appropriate for the desired speed (e.g., Cat5e/6 for Gigabit Ethernet). Check for duplex mismatches or network congestion.
6.3. Alarm LED On
If the ALM LED is illuminated, it indicates a system alarm. This could be due to various reasons such as hardware failure, environmental issues, or configuration errors. Access the switch's CLI via the console port to view detailed alarm messages and logs. Consult the Junos OS documentation or Juniper Networks support for specific alarm interpretations and resolution steps.
7. Sonraíochtaí Teicniúla
| Gné | Sonraíocht |
|---|---|
| Uimhir Mhúnla | EX2200-C-12T-2G |
| Branda | Líonraí Juniper |
| Meáchan Mír | 4.41 punt |
| Toisí Táirge (LxWxH) | 9 x 11 x 2 orlach |
| Imltage | 230 Volta |
| Ábhar Cás | Plaisteach |
| Rátáil Teochta Uachtarach | 40 Céim Celsius |
| Cineál Comhéadain | RJ45, SFP |
| Ráta Aistrithe Sonraí | 1000 Meigeavata in aghaidh an tSoicind |
| Líon na gCalafort | 12 (RJ-45) + 2 (SFP) |
| RAM | 512 MB |
| Méid Cuimhne Flash | 1024 MB |
| Córas Oibriúcháin | Junos |
8. Barántas agus Tacaíocht
8.1. Faisnéis Bharántas
For detailed warranty information regarding your Juniper EX2200-C-12T-2G switch, please refer to the warranty card included with your product or visit the official Juniper Networks websuíomh. Féadfaidh téarmaí agus coinníollacha an bharántais a bheith éagsúil de réir réigiúin agus dáta ceannaigh.
8.2. Tacaíocht Theicniúil
If you encounter issues that cannot be resolved using the troubleshooting steps in this manual, or require advanced assistance, please contact Juniper Networks technical support. Support resources, including documentation, knowledge bases, and contact information, are available on the official Juniper Networks support portal.